本文代码基于SpringBoot,文末有代码连接 。首先是一些在Spring Boot的一些配置和概念,然后跟随代码看下五种模式
MQ两种消息传输方式,点对点(代码中的简单传递模式),发布/订阅(代码中路由模式)。要是你熟悉RabbitMQ SpringBoot配置的话,就是simple和direct。
MQ安装指南:https://blog.csdn.net/qq_19006223/article/details/89421050
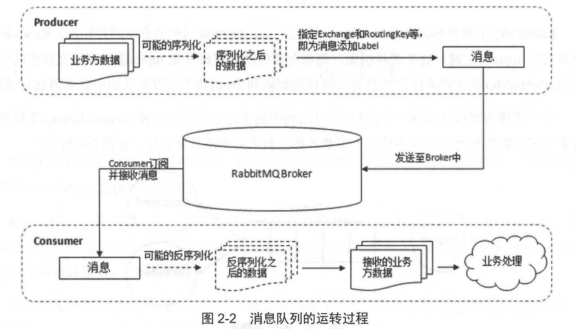
0.消息队列运转过程

生产者生产过程:
(1)生产者连接到 RabbitMQ Broker 建立一个连接( Connection) ,开启 个信道 (Channel) (2) 生产者声明一个交换器 ,并设置相关属性,比如交换机类型、是否持久化等 (3)生产者声明 个队列井设置相关属性,比如是否排他、是否持久化、是否自动删除等 (4)生产者通过路由键将交换器和队列绑定起来。 (5)生产者发送消息至 RabbitMQ Broker ,其中包含路由键、交换器等信息。 (6) 相应的交换器根据接收到的路由键查找相匹配的队列 如果找到 ,则将从生产者发送过来的消息存入相应的队列中。 (7) 如果没有找到 ,则根据生产者配置的属性选择丢弃还是回退给生产者 (8) 关闭信道。 (9) 关闭连接。消费者接收消息的过程:
(1)消费者连接到 RabbitMQ Broker ,建立一个连接(Connection ,开启 个信道(Channel) (2) 消费者向 RabbitMQ Broker 请求消费相应队列中的消息,可能会设置相应的回调函数, 以及做 些准备工作。 (3)等待 RabbitMQ Broker 回应并投递相应队列中的消息, 消费者接收消息。 (4) 消费者确认 ack) 接收到的消息 (5) RabbitMQ 从队列中删除相应己经被确认的消息(6) 关闭信道。(7)关闭连接。1.项目结构

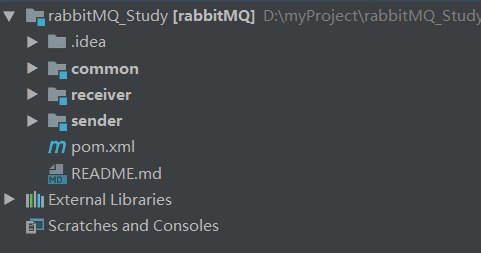
common是工具,receiver是消费者,sender是生产者
具体各自的pom.xml文件请看项目,都有注释。
2.sender(生产者的配置)

#确认机制 publisher-confirms: true 消息有没有到达MQ(会返回一个ack确认码) publisher-returns: true 消息有没有找到合适的队列 主要是为了生产者和mq之间的一个确认机制,当消息到没到mq,会提供相应的回调,在项目中 RabbitSender 这个类中进行了相应的配置


1 private final RabbitTemplate.ConfirmCallback confirmCallback = (correlationData, ack, s) -> { 2 if (ack) { 3 System.out.println(correlationData.getId()); 4 } else { 5 log.error("ConfirmCallback消息发送失败: {}", s); 6 } 7 }; 8 9 private final RabbitTemplate.ReturnCallback returnCallback = (message, replyCode, replyText, exchange, routingKey)10 -> log.error("ReturnCallback消息发送失败: {}", new String(message.getBody(), StandardCharsets.UTF_8));11 12 13 public void sendMsg(String exchangeName, String routingKeyName, T content) {14 // 设置每个消息都返回一个确认消息15 this.rabbitTemplate.setMandatory(true);16 // 消息确认机制17 this.rabbitTemplate.setConfirmCallback(confirmCallback);18 // 消息发送失败机制19 this.rabbitTemplate.setReturnCallback(returnCallback);20 // 异步发送消息21 CorrelationData correlationData = new CorrelationData();22 correlationData.setId("123");23 this.rabbitTemplate.convertAndSend(exchangeName, routingKeyName, content, correlationData);24 } 还可以根据需求设置发送时CorrelationData 的值
#mandatory
参数设为 true 时,交换器无法根据自身的类型和路由键找到一个符合条件 的队列,那么 RabbitM 会调用 Basic.Return 命令将消息返回给生产者。 默认为false,直接丢弃 3.receiver(消费者配置)

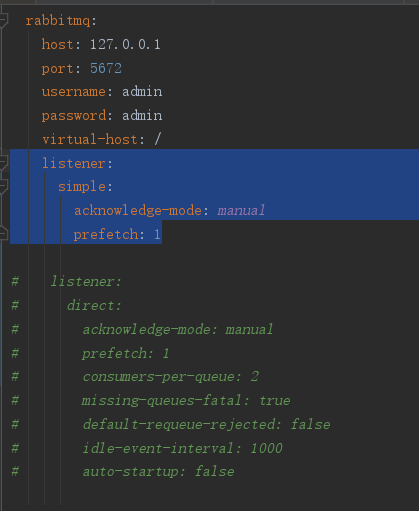
这里主要说一下 listerner 的相关配置
一共有两种模式:simple和direct模式
simple主要包括两种工作模式,direct主要包括四种,待会代码会详解。
先说主要配置(以direct为例)
#acknowledge-mode: manual
手动确认模式,推荐使用这种。就是说当消息被消费者消费时,需要手动返回信息告诉mq。如果是自动的话,mq会自动确认,不管你消费者是否完成消费(比如说抛出异常)
#prefetch: 1
一个消费者一次拉取几条消息,本demo一条一条来。
#consumers-per-queue: 2
一个队列可以被多少消费者消费(这个配置,我测试的时候没测试出来,如果有朋友了解的话,可以评论下。)
还有其他配置,看下源码,两种模式共有的

simple特有的

direct特有的

4.各种模式详解
---------simple方式下的两种
打开上面的listener配置

4.1 simple
一个生产者,一个消费者
生产者发送消息都在SenderTest里面
生产者:
/**简单模式*/ @Test public void senderSimple() throws Exception { String context = "simple---> " + new Date(); this.rabbitTemplate.convertAndSend("simple", context); } 消费者
@RabbitListener(queues = "simple") public void simple(Message message, Channel channel){ String messageRec = new String(message.getBody()); System.out.println("simple模式接收到了消息:"+messageRec); try { channel.basicAck(message.getMessageProperties().getDeliveryTag(), false); } catch (IOException e) { System.out.println("报错了------------------"+e.getMessage()); } } 输出
simple模式接收到了消息:simple---> Sat Apr 20 20:40:16 CST 2019
4.2 work 模式
一个生产者,多个消费者
生产者
private static final Listints = Arrays.asList(0, 1, 2, 3, 4, 5, 6, 7, 8, 9, 10); /**work模式*/ @Test public void senderWork() throws Exception { ints.forEach((i)->{ String context = "work---> " + i; this.rabbitTemplate.convertAndSend("work", context); }); }
消费者
@RabbitListener(queues = "work") public void work1(Message message, Channel channel){ try{ Thread.sleep(500); }catch (Exception e){ System.out.println(e.getMessage()); } String messageRec = new String(message.getBody()); System.out.println("work1接收到了消息:"+messageRec); try { channel.basicAck(message.getMessageProperties().getDeliveryTag(), false); } catch (IOException e) { System.out.println("work1报错了------------------"+e.getMessage()); } } @RabbitListener(queues = "work") public void work2(Message message, Channel channel){ try{ Thread.sleep(1000); }catch (Exception e){ System.out.println(e.getMessage()); } String messageRec = new String(message.getBody()); System.out.println("work2接收到了消息:"+messageRec); try { channel.basicAck(message.getMessageProperties().getDeliveryTag(), false); } catch (IOException e) { System.out.println("work2报错了------------------"+e.getMessage()); } } 输出
work1接收到了消息:work---> 2work2接收到了消息:work---> 0work1接收到了消息:work---> 1work1接收到了消息:work---> 4work2接收到了消息:work---> 3work1接收到了消息:work---> 6work1接收到了消息:work---> 7work2接收到了消息:work---> 5work1接收到了消息:work---> 8work1接收到了消息:work---> 10work2接收到了消息:work---> 9
-----direct方式下的
切换listener配置

4.3direct交换机
生产者发送消息给指定交换机,绑定的某个队列。
消费者通过监听某交换机绑定的某个队列接受消息。
生产者
/**direct交换机*/ @Test public void senderDirect() throws Exception { rabbitSender.sendMsg("direct","directKey1","directContent1"); rabbitSender.sendMsg("direct","directKey2","directContent2"); } 消费者
@RabbitListener(bindings = @QueueBinding(exchange = @Exchange("direct"), key = "directKey1" , value = @Queue(value = "directQueue1", durable = "true", exclusive = "false", autoDelete = "false"))) public void direct1(String str, Channel channel, Message message) throws IOException { try { System.out.println("directQueue1接收到了:"+str); }catch (Exception e){ channel.basicNack(message.getMessageProperties().getDeliveryTag(), false,false); } } @RabbitListener(bindings = @QueueBinding(exchange = @Exchange("direct"), key = "directKey2" , value = @Queue(value = "directQueue2", durable = "true", exclusive = "false", autoDelete = "false"))) public void direct2(String str, Channel channel, Message message) throws IOException { try { System.out.println("directQueue2接收到了:"+str); }catch (Exception e){ channel.basicNack(message.getMessageProperties().getDeliveryTag(), false,false); } } 输出
directQueue1接收到了:directContent1directQueue2接收到了:directContent2
4.4 topic交换机
指定主题
# :匹配一个或者多级路径
*: 匹配一级路径
生产者
@Test public void senderTopic() throws Exception { String contexta = "topic.a"; rabbitSender.sendMsg("topic","topicKey.a",contexta); String contextb = "topic.b"; rabbitSender.sendMsg("topic","topicKey.b",contextb); String contextc = "topic.c"; rabbitSender.sendMsg("topic","topicKey.c",contextc); String contextz = "topic.z"; rabbitSender.sendMsg("topic","topicKey.c.z",contextz); } 消费者
/** * topic交换机 * */ @RabbitListener(bindings = @QueueBinding(exchange = @Exchange(name = "topic",type = "topic"), key = "topicKey.#" , value = @Queue(value = "topicQueue", durable = "true", exclusive = "false", autoDelete = "false"))) public void topicQueue(String str, Channel channel, Message message) throws Exception { try { System.out.println("topicQueue接收到了:"+str); }catch (Exception e){ channel.basicNack(message.getMessageProperties().getDeliveryTag(), false,false); } } 输出
topicQueue接收到了:topic.a
4.5 Fanout 交换机
广播模式,一个消息可以给多个消费者消费
生产者
/**Fanout 交换机*/ @Test public void senderFanout() throws Exception { String contexta = "Fanout"; rabbitSender.sendMsg("fanout","fanoutKey1",contexta); //写不写KEY都无所谓 } 消费者
/** * Fanout 交换机 * */ @RabbitListener(bindings = @QueueBinding(exchange = @Exchange(name = "fanout",type = "fanout"), key = "fanoutKey1" , value = @Queue(value = "fanoutQueue1", durable = "true", exclusive = "false", autoDelete = "false"))) public void fanoutQueue1(String str, Channel channel, Message message) throws Exception { try { System.out.println("fanoutQueue1接收到了:"+str); }catch (Exception e){ channel.basicNack(message.getMessageProperties().getDeliveryTag(), false,false); } } @RabbitListener(bindings = @QueueBinding(exchange = @Exchange(name = "fanout",type = "fanout"), key = "fanoutKey2" , value = @Queue(value = "fanoutQueue2", durable = "true", exclusive = "false", autoDelete = "false"))) public void fanoutQueue2(String str, Channel channel, Message message) throws Exception { try { System.out.println("fanoutQueue2接收到了:"+str); }catch (Exception e){ channel.basicNack(message.getMessageProperties().getDeliveryTag(), false,false); } } 输出
fanoutQueue2接收到了:FanoutfanoutQueue1接收到了:Fanout
4.6 Headers 交换机
代码:https://github.com/majian1994/rabbitMQ_Study